Thursday, February 24, 2011

Java Hut


Undoubtedly this will be the first of a number of posts I will write about Java Hut. Java Hut is the result of a conversation which took place after an outside community service activity done a few years ago at my school. As I finished up, I was chatting with a fellow teacher just outside the Woodlands Office and we came to the conclusion that we needed some down time with our colleagues where we could chat and relax...find a brief moment of sanity in our otherwise busy days. And of course, we wanted there to be coffee, good coffee...not faculty room coffee or dining hall coffee, but rich, dark espresso and of course cappuccinos.  And so, Java Hut was born.

I eventually purchased a used espresso machine on E-bay that now resides at Java Hut (previously known as the Woodlands Office) ready to be called upon for a Friday morning free block "Java Hut", a post end of term faculty meeting "Hut" and at the holidays, the now infamous "Nog Hut". But what goes great with coffee? Well frankly, any baked good as far as I am concerned and so the offshoot of this caffeine/socialization gathering is that I have more reasons to bake! And bake I do....for every Java Hut.

And today, I plan on letting you in on a little secret. Biscotti, although they may seem mysterious, are frankly ridiculously easy to make. You just need to have the time to do both "bakes", the cooking of the batter and the crisping of the cookie. Below is a recipe for one of the more decadent biscotti recipes I use because it actually has some butter in it. Biscotti freezes well and makes a great housewarming or holiday gift. So bake up some biscotti find yourself a good friend and a great cup of coffee and sit back and enjoy your own Java Hut.

Chocolate, Almond and Cranberry Biscotti
(adapted from a recipe from "The Bon Appetit Cookbook")

Preheat oven to 350 degrees

1 1/2 cups all-purpose of white wheat flour
3/4 cup sugar
1/2 cup unsweetened cocoa powder
2 teaspoons baking soda
1/8 teaspoon salt
3 large eggs
2 teaspoons vanilla extract
1/4 cups (1/2 stick) butter, melted
1 cup dried cranberries
1/2 cup white chcolate chips
1 cup sliced almonds(optional)

White Chocolate for the drizzle(optional) *

*If you do choose to so this, be sure to purchase the white chocolate for melting/baking that is in the baking aisle of your supermarket. White chcolate chips DO NOT WORK!)

Sift flour with next four ingredients in large bowl. Whisk eggs and vanilla in medium bowl, then beat egg mixture into dry ingredients. Add melted butter and mix to blend. Stir in cranberries chips and almonds.

I have a biscotti pan which is quite handy (Thank you Alex)! but you can also simply form either two medium "loaves" or one large "loaf" on a cookie sheet lined with parchment paper. Bake for ~25 minutes or until the loaf feels somewhat firm to the touch. (The great news is, they are supposed to be crunchy, so you don't have to worry too much about overbaking them.)

Remove from oven and let cool for about 5 minutes. Using a large, sharp knife cut the loaves on a diagonal ~ 1/2 inch thickness. It is ok if the end pieces are shorter and a bit wonky-looking. Place all of the pieces cut side up (or down) on the lines cookie sheet and bake for another 10-12 minutes on each side. Place on a wire rack to cool. Melt the white chocolate according to package directions and use a fork to drizzle over your biscotti in an opposing diagonals pattern. (Can you tell I am a math teacher?)

Make yourself cup of coffee and enjoy!

Yours in baking-
p

Monday, February 21, 2011

But it's fruit!


This is my favorite exclamation of rationalization whenever I encounter a baked good I really want to eat, but maybe shouldn't. Who can argue the benefits of adding some more fruit and whole grains to your diet?! The fiber! The anti-oxidants! All right....the moist tasty morsels of nutty/ fruity goodness that happen when you indulge in a piece of this Whole Grain Berry Coffee Cake. This recipe bakes up in a spring form pan, is quite flexible and can easily be made the night before and reheated in the morning. To reheat, I just cover it with foil and put it in the oven at 300 degrees for about 30 minutes. So if you are looking for a way to add a little treat to your Monday morning coffee break or want to wow some house guests, this recipe might be just what you are looking for...after all..it's fruit!

Whole Grain Berry Coffee Cake

Topping:
2 Tablespoons butter, cut into small pieces
1/4 cup white wheat flour
1/3 cup firmly packed brown sugar
2 teaspoons cinnamon
1 cup chopped pecans

Mix flour, sugar and cinnamon in bowl. Cut in butter until the mixture is crumbly. Stir in pecans.

Coffee Cake:
1/2 cup canola oil
1/2 cup white sugar
1/2 cup firmly packed brown sugar
2 large eggs
1 teaspoon vanilla extract
1 cup whole wheat flour
1/2 cup white wheat flour(or all-purpose)
1/2 graham flour*
1 teaspoon baking powder
1 teaspoon baking soda
1/4 teaspoon salt
1 cup buttermilk or plain yogurt*
2 cups fresh or frozen berries

In a large bowl, combine the oil, sugars, eggs and vanilla and mix with a wooden spoon until smooth. In a medium bowl, combine flours, baking powder, baking soda and salt. Add to the creamed mixture alternately with the buttermilk(or yogurt) in 2 parts. Mix until smooth. Stir in berries and pour into greased and lightly floured 9-inch spring form pan. Sprinkle topping evenly over batter.

Bake for ~40-50 minutes in a 350 degree oven or until toothpick inserted in center comes out clean(maybe a few crumbs are clinging to it!)

Let cool for about 10 minutes before removing from pan. Slice and enjoy!

*A few notes:
   You could certainly make this with any flour combination, but I like the substance that comes from using the whole grains. Graham flour is not easy to find, but sooooo worth it. I buy mine at a local coop and it is from a company called Morgan's Mills from East Union, Maine. (1-207-785-4900)
   I do not keep buttermilk on hand, but I do use buttermilk powder which I have hydrated and that works just fine.

yours in baking-
p

Anadama....damn her!

 
 So I have been doing a little research about this bread and the story I grew up with is pretty darn close to most of the stories I have been finding out there. The story goes that in Maine(or Massachusetts, depending on where you live and what the local lore says), there was a fisherman who came back from a hard day's work only to find that his wife had not prepared his meal. So he exclaimed, "Anna, damn her!". Being left to fend for himself, he put together some molasses and cornmeal on hand and baked it, coming up with the basis of the recipe we now call Anadama Bread. This bread is slightly sweet, and makes fabulous toast! I have some friends returning from a long trip and I thought a loaf of this would make a perfect welcome home gift. It really takes very little time to mix up. You just "knead" to be around for a few hours for the overall process. :)

Anadama Bread
2 cups boiling water 
1/2 cup cornmeal (I use stoneground) 
1/2 cup molasses 
2 Tablespoons oil
1 Tablespoon salt
2 packages dry yeast
7-8 cups of flour (you can use all bread flour or all-purpose flour, but I typically use at least half white wheat or whole wheat flour)

In a large bowl, combine corn meal and molasses with two cups of boiling water. Add the next three ingredients and cool to lukewarm.

Sprinkle yeast into 1/4 cup warm water, and let stand until dissolved. Stir into cornmeal mixture.

Add flour to make a stiff dough and knead until smooth and elastic. Place in greased bowl and cover with a towel or plastic wrap and let rise in a warm place until double in bulk. Punch down, divide into two and place in greased loaf pans. Let rise ~30 more minutes and bake in a preheated 425 degree oven for 10 minutes. Then reduce the heat to 375 degrees. Bake ~20-30 minutes longer or until loaf sounds hollow when you tap it on the bottom.

Remove from oven, rub butter over the top of each loaf. Slice and enjoy!

yours in baking-
p


Thursday, February 17, 2011

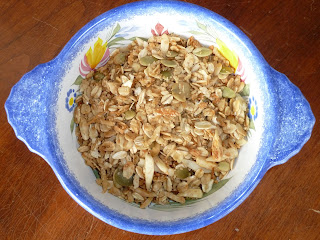
Granola Time!

Every couple of months or so I make a batch of homemade granola both for me and to give to friends and family. This recipe makes quite alot of granola so it is perfect for sharing. The great thing is that it is a recipe that you can make all your own by simply adding or deleting ingredients according to your taste preferences.

I have always been a fan of "thingys" as my daughter used to call them when they showed up in her sandwich bread. To us, "thingys" are any nuts or seeds that (in my opinion) add to the overall taste and texture of a food item. Given her choice, she would have preferred Wonder Bread growing up which I could just not ever bring myself to buy. I have to say, she has expanded her horizions and is now alot more open to whole grain foods with TEXTURE! This may be due, in part, to her current living situation in the Pacific Northwest where locally grown, whole grain food is a given.

Anyway, give this recipe a try and let me know if you find any new "must-have" ingredients that you add to your version. I am always looking for new ideas. I must say I love a bowl of this with some Greek yogurt and fruit for breakfast, but it is equally good with just cow's milk or soy milk either for breakfast or a snack. This also freezes really well, as long as you put it in an airtight container or Ziploc bag.

Vanilla-Maple Granola

~6-7 cups of Organic old fashioned oats
1 1/2 cups of raw organic pumpkin seeds
1 1/2 cups of organic oat bran
1 12 ounce package of sweetened flaked coconut
2 1/2 cups of either sliced OR slivered almonds

Other options here:
(ground or whole flax seed, wheat germ, sunflower seeds, sesame seeds or other nuts)

The liquid ingredients:
~ 3/4 cup vegetable oil
~ 3/4 cup pure maple syrup, or honey or a mixture of both
~ 2 tsp. pure vanilla extract
Optional:
(ground ginger or cinnamon)

Preheat oven to 350 degrees. 
   Mix all of the dry ingredients in a LARGE bowl. In a large glass measuring cup, mix together all liquid ingredients and pour over oat mixture, carefully tossing to be sure everything is coated evenly. Spread evenly between two EDGED cookie sheets. I bake it for a total of ~40 minutes until it is as toasted as you like it. Really, as any baker knows....you should always be in the lookout for "G, B and D"...golden, brown and delicious. The one thing I really try to avoid is that horrible burnt taste when a sugar goes to the "dark side", so be careful.

This is my usual baking process.
    1) One sheet on the middle rack and one just below.... bake for 15 minutes.
    2) Switch racks and thoroughly stir and redistribute granola evenly on pans....bake another 15 minutes.
    3) Switch and mix and put back in the over for ~10 minutes keeping a close eye on the granola at this point.

I put a couple of big sheets of parchment paper out on the counter and spread it on there for the granola to cool before I put it in bags. Enjoy-


yours in baking-
p

Tuesday, February 15, 2011

Pumpkin Fruit Bread

Well, I know this sounds like a strange recipe for mid-February and you might think it better suited for a fall afternoon, but really how can you go wrong with a thick slice of sweet bread with your morning cup of 'jo. This recipe is so easy and it makes two loaves which means some for me and some to pass along. Just as with my carrot cake, I like to add chopped crystallized ginger to the recipe.


The ginger works well with the other typical baking spices of cinnamon, nutmeg and cloves and I think the moist chewy nuggets of ginger offset the crunchiness of the nuts. No need for a spread of any kind, this bread is delicious on its own.

yours in baking-
p


Pumpkin Bread  (2 loaves)

2 cups sugar
1 cup vegetable oil
3 eggs
1 16-ounce can cooked pumpkin
2 cups all-purpose flour
1 cup white wheat flour
1 tsp. baking soda
1/2 tsp. salt
1/2 tsp. baking powder
1tsp. ground cinnamon
1 tsp. ground cloves
1 tsp. ground nutmeg
3/4 cup chopped crystallized ginger
3/4 cup chopped walnuts OR pecans
1/2 cup dried cranberries (optional)

In large bowl, beat together sugar and oil. Add eggs and beat until well mixed, then do the same for the pumpkin. Sift dry ingredients together in a separate bowl and then add to the pumpkin mixture. Stir until moistened. Fold in ginger and nuts (and cranberries if you are using them). Spread batter evenly between two greased standard loaf pans.

Bake at 325 degrees for ~ 60 minutes or until toothpick inserted in middle comes out clean. Let cool in pans for about ten minutes before removing from pan.


Maple Carrot Cake Recipe

Cake
2 cups unbleached flour
2 tsp. baking powder
2 tsp. baking soda
3/4 tsp. ground cinnamon
1/2 tsp. ground ginger
1/2 tsp. ground nutmeg
1 tsp. salt
1 cup pure maple syrup(I use Grade B)
1 cup sugar
1/2 cup vegetable oil
4 large eggs
4+ cups of grated carrots
1/2 cup chopped crystallized ginger
3/4 Cup chopped pecans
1/2 cup shredded coconut(optional)


Sift dry ingredients into medium bowl.
In large bowl, whisk syrup, sugar and oil together. Then beat in eggs, one at a time. Grdually add dry ingredients, then carrots, ginger and pecans.

Spread batter in 2 greased and floured cake pans(8 or 9 inch) and bake at 350 on the center rack for 38-45 minutes. You know your cake is done when the top springs back when you touch it.


Let cakes cool in pans for ~10 minutes before removing cakes. Don't worry if a few bits of the ginger stick to your cake pan...they make for excellent snacking!

Frosting
2 to 3 cups of confectioner's sugar
1 8 ounce package of cream cheese, softened
4 TBS. softened butter
2 tsp. pure vanilla extract
1/4 cup of pure Maple Syrup, as needed

Using electric mixer, beat cream cheese and butter together until smooth, add sugar and vanilla and continue to beat, slowly adding maple syrup until desired consistency. I like it pretty soft, myself.

Frost your cake and enjoy!

Chocolate Cupcake Recipe

"The Cooks'" Ultimate Chocolate Cupcakes with Ganache Filling (Makes 12 cupcakes)
Ganache Filling
            2             ounces good quality bittersweet chocolate, chopped fine
            ¼             cup heavy cream
            1             tablespoon confectioners’ sugar

Chocolate Cupcakes
            3             ounces good quality bittersweet chocolate, chopped fine
            1/3           cup (1 ounce) Dutch-processed cocoa
            ¾             cup hot coffee
            ¾             cup (41/8 ounces) bread flour
            ¾             cup (5¼ ounces) granulated sugar
            ½             teaspoon table salt
            ½             teaspoon baking soda
            6             tablespoons vegetable oil
            2             large eggs
            2             teaspoons white vinegar
            1             teaspoon vanilla extract
          
1. For ganache filling: Place -chocolate, cream, and confectioners’ sugar in medium -microwave-safe bowl. Heat in microwave on high power until mixture is warm to touch, 20 to 30 seconds. Whisk until smooth; transfer bowl to refrigerator and let stand until just chilled, no longer than 30 minutes.
2. For cupcakes: Adjust oven rack to middle position and heat oven to 350 degrees. Line -standard-size muffin pan with baking-cup liners. Place chocolate and cocoa in medium bowl. Pour hot coffee over mixture and whisk until smooth. Set in refrigerator to cool completely, about 20 minutes. Whisk flour, sugar, salt, and baking soda together in medium bowl; set aside.
3. Whisk oil, eggs, vinegar, and vanilla into cooled chocolate-cocoa mixture until smooth. Add flour mixture and whisk until smooth.
4. Divide batter evenly among muffin pan cups. Place one slightly rounded teaspoon ganache filling on top of each cupcake. Bake until cupcakes are set and just firm to touch, 17 to 19 minutes. Cool cupcakes in muffin pan on wire rack until cool enough to handle, about 10 minutes. Carefully lift each cupcake from muffin pan and set on wire rack. Cool to room temperature before frosting, about 1 hour.


Frosting Recipe

My frosting recipe is a bit "off the cuff". I start with a stick of softened butter, put in a large spoonful of Marshmallow Fluff, (not marshmallow creme) and beat until combined. I then put in 2-4 cups of confectioner's sugar and a bit of milk (or cream, if I have it on hand.) I like to divide the frosting into two parts at this point and give them each their own distinct flavor. (My daughter Caroline did this for a Christmas Eve treat this year and it was terrific.) 

Some options are:
peppermint extract (decorate with Andes peppermint crunch)
coconut extract  (decorate with toasted coconut or shredded sweetened coconut
espresso powder (decorate with an chocolate covered espresso bean)
orange extract (decorate with a piece of candied orange peel)

Early Birthday = Maple Carrot Cake


If you are looking for a not too sweet carrot cake recipe which only uses 1/2 cup of oil and is still tantalizingly moist, this is a great recipe to try. I typically increase the amount of grated carrots and almost always add some chopped crystallized ginger which is a nice surprise. The cake uses maple syrup(I use Grade B) as some of the sweetener and even the cream cheese frosting has maple syrup in it. I reduce the amount it calls for in the frosting because I do not want the maple flavor to be overpowering. This cake is very dependable, quite easy to make and has an open mind...it is always ready for a new addition or interpretation!

yours in baking-
p

Saturday, February 5, 2011

A week of baking.....surprise, surprise.

Well, despite my best efforts to document my baking "addiction" with some photos, this week has been full of baking, but NO photos.

After last Sunday's decadent cupcake adventure, I managed to resist the urge until early Wednesday morning when I found myself up at 5:30 am with 8 inches of new snow on the ground. Typically, I head out by 6:15 to meet some good friends and go for a walk before work, but I knew I would never make it out of my driveway....and frankly, a longer morning at home is a welcome change. So...what do I do with my extra time,,, I bake for my math department colleagues. I have always loved Morning Glory muffins and decided to finally make them myself. I was surprised by how long it took to grate the carrots, peel and dice the apple, etc...but maybe that was just because I had not finished my cup of coffee! Anyway, I was pleased with how tasty the muffins were and they were a nice addition to our cozy office as people slowly arrived covered with snow and stomping their boots in the doorway. (By the way, it took me approximately 40 tries to make it up and out of my steep uphill driveway, but I made it. GO SUBARU!)

Thursday evenings typically bring the prospect of "Java Hut" on Friday mornings and the opportunity to bake again for the weekly gathering! (More about Java Hut another time.) Anyway, it was my friend Kayden's birthday, so of course we had to have a celebratory birthday coffee cake; this time a yummy buttermilk/cinnamon batter with chopped Ghiradelli milk chocolate in it and pecans on top. And, since I had not made biscotti in a few weeks, I decided to go crazy and make two things for our morning gathering. I love the chocolate biscotti recipe form the Bon Appetit cookbook, but I make a few changes like some chopped dried cherries and white chocolate chips. When they are completely baked and cooled, I drizzle them with some melted white chocolate..which go nicely with a freshly brewed cappuccino.

I took off 24 hours before venturing into the sugar/butter/flour world again and baked the first layer of a chocolate cake for Kayden's 70's themed birthday party. It is a really easy recipe but I baked it in a springform pan which I thought would NEVER cook, but it did. (Notice the concave nature of the cake below)Super moist and dark(from the brewed coffee in the batter), I baked layer #2 today. I split the layers and put raspberry jam between them and will frost to all with a bright yellow buttercream. I am making a smiley face "Have a Nice Day" cake in honor of the 70's retro theme.


Just to keep me busy while I was waiting for the cake to bake, I mixed up and have since baked off some of my "Almond Joy" cookies. I take a basic chocolate chip cookie recipe and make some adjustments...almond flavoring, coconut, wheat germ, slivered almonds and they end up having all of the nice flavors of the candy bar, but in crispy, chewy cookie form. I head out to Tucson tomorrow to visit a group of students from my school who are on a traveling program which I oversee....so they will enjoy the treats and I got to bake.

Won't be back until later in the week, but no doubt there will be more baking!

yours in baking-
p